Timecode Sections and Batch Export
Turn one rehearsal recording into a set of named clips that carry the show's own timecode. Ready to drop into Cuepoints or anything else that chases timecode.
The whole thing in four steps:
- Record the rehearsal with timecode running.
- Name the sections. Names are stored with the show, so they come back on every future recording of it.
- Batch export the sections as clips.
- Open them in Cuepoints and set LTC is Right.
1. Record with timecode
Set your timecode input under Preferences → Timecode. See Timecode for the input options, and Setup and Recording for everything else about recording.
One thing to check before you roll: the timecode readout in the toolbar should be counting.
If it reads --:--:--:--, ShowRevue isn't receiving anything and none of the rest of this
will work.
Check your input level too. If the log warns that the timecode input is clipping, turn the input gain down. That one can't be fixed afterwards.
Then record as normal. ShowRevue keeps the timecode on its own audio track inside the recording.
2. Find the timecode blocks
Open the recording in Playback and go to the Timecode tab.
Each unbroken run of timecode shows up as a numbered block, with its start and end timecode, how long it runs, and where it sits in the video. A gap between blocks is a moment where timecode stopped. A break between acts, or a desk reset.
Record straight through and you get one block. Restart timecode for each act and you get one per act, which is usually what you want to export.
No blocks on a take that had LTC running? The timecode was recorded on its audio track but never decoded live. Run Playback → Recover Timecode from Audio… and ShowRevue decodes the LTC track offline and writes the blocks and per-cue timecode back into the recording. The rest of this workflow then works as normal.
3. Name the sections
Double-click a block to name it: Opener, Storm Sequence, Finale.
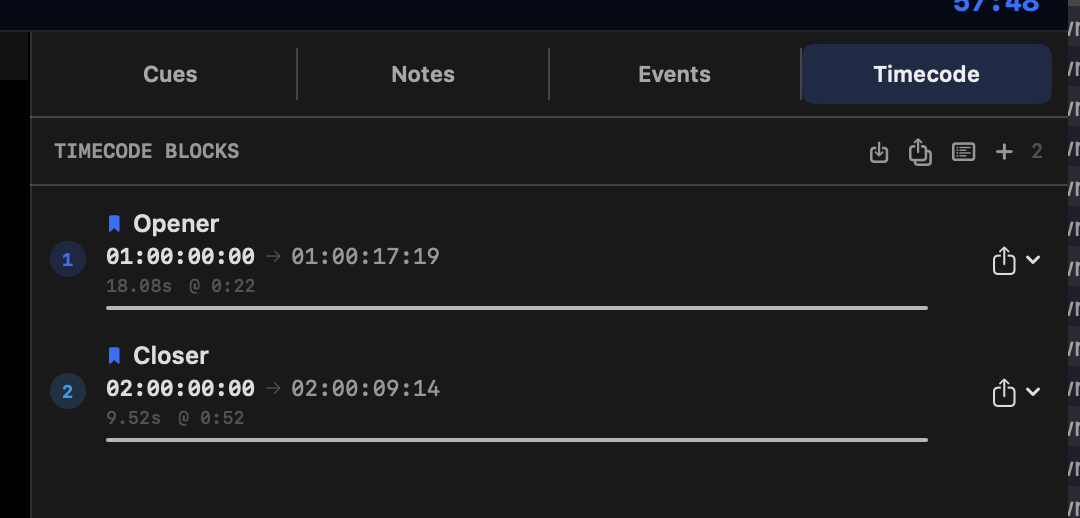
Two named sections, each showing its timecode range, how long it runs, and where it sits in the video. The buttons in the header are import, batch export, report and add.
Names are stored with the show, not with the recording. Name Opener once and it's there on every future recording of that show, the same stretch, night after night. Name your sections at the first tech and they carry through the rest of the run.
Once named, a section shows up:
- on the block rows in the Timecode tab
- as bands on the playback scrubber
- live on the Mac and in the companion app during the show
- in the filename of each exported clip
You can also add sections by hand with the + button by typing a start and end timecode,
or import a whole list from a CSV: one section per line, start,end,name, with timecodes
as HH:MM:SS.
Naming and editing sections needs a Capture licence. Free can see sections and follow a live show, but not create them.
4. Batch export the sections
Use the batch export button in the Timecode tab header. It asks for three things.
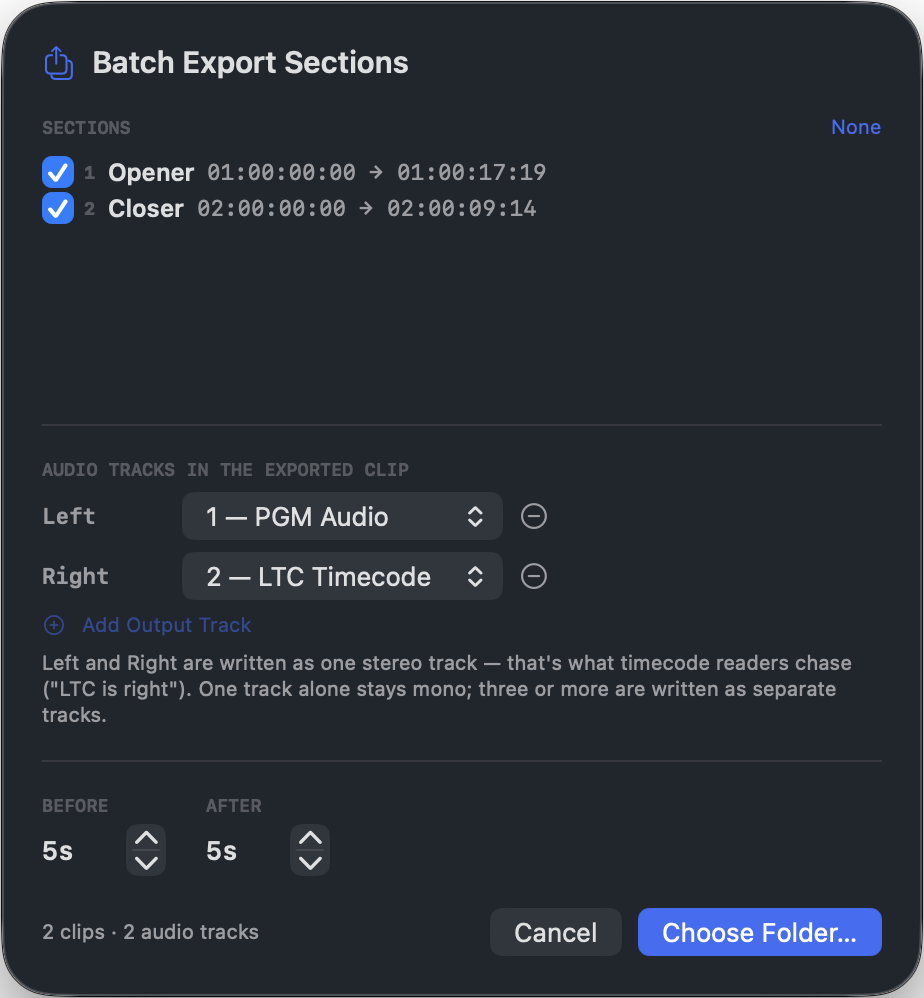
Pick your sections, set which recorded track goes left and which goes right, and set the lead-in and lead-out.
Which sections. Everything is ticked to start with. Untick what you don't need.
Where the audio goes. Each output track takes one track from the recording:
| Output | Source |
|---|---|
| Left | Programme audio |
| Right | Timecode |
ShowRevue fills this in for you. It knows which recorded track holds the timecode. Left and Right go out as one stereo track, which is what timecode readers expect.
Lead-in and lead-out. How much extra video to include either side of each section, five seconds by default.
Then pick a folder. Each section comes out as its own clip, named after the recording and
the section. They export one at a time, with progress in the header. Anything already in the
folder is left alone. A repeat export lands as …_2, …_3.
The video isn't re-encoded, so nothing is lost in the trim.
5. Open it in Cuepoints
Add the clip to Cuepoints as a track, then open its track settings:
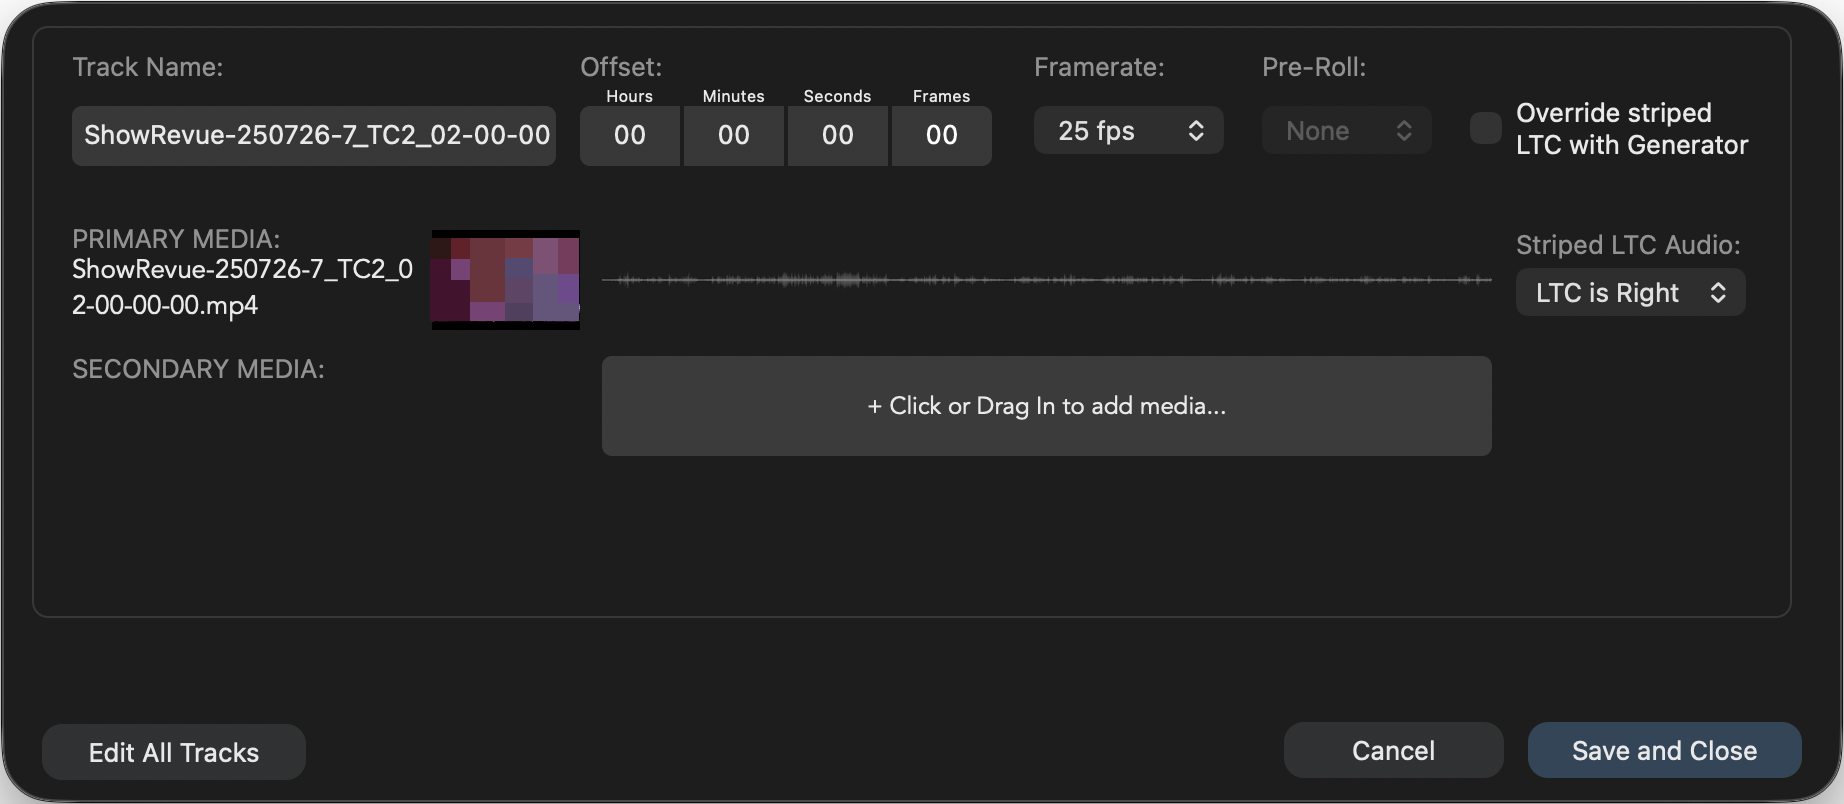
Framerate matched to the recording, offset at zeros, and Striped LTC Audio set to LTC is Right.
- Framerate. Match the recording. 25 fps for a show striped at 25.
- Striped LTC Audio. Set to LTC is Right. Cuepoints reads the right-hand channel of the clip and chases the timecode there.
- Offset. Leave it at zeros. The clip already carries real timecode.
- Override striped LTC with Generator. Leave it off, or you'll replace the recorded timecode with a made-up one.
Cuepoints locks to the timecode in the clip. Because that's the show's own timecode, a clip from any rehearsal lines up with any other.
If it won't lock, look at the waveform Cuepoints draws for the track. If you're seeing programme audio there, the audio went out the wrong way round. Export again with timecode on Right.
6. Export a timecode report
The report button in the Timecode tab header writes a spreadsheet listing every section: its timecode range, how long it runs, and the LX cues that fired inside it, with cue number and label.
Opener runs 01:00:00 → 01:23:14 and holds LX 1 through 88. Send it out with the clips
and everyone can see what's in each one without opening the recording.
Unnamed blocks are in there too, with the name column left blank, so nothing gets missed.
Related
- Timecode. Setting up timecode input
- Timecode Output. Sending timecode out during playback
- Playback and Cues. The rest of the playback workflow
- Reports. The other reports ShowRevue can produce